How to exit 3D Mode in Photoshop
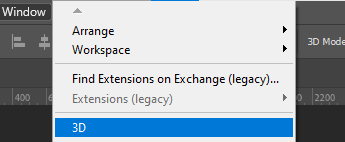
- Enable 3D Panel: Go to “Window” > “3D.”
- Open Layers Panel: Go to “Window” > “Layers.”
- Select 3D Layer: Click the 3D layer in the Layers panel.
- Exit 3D Mode: In the 3D panel, click the 3D menu icon and select “Close.”
- Verify: Ensure the layer is now 2D and no 3D elements remain.
Adobe Photoshop has become a go-to tool for professionals and enthusiasts alike. With its extensive features and capabilities, Photoshop allows users to create stunning visuals, manipulate images, and bring their creative visions to life.
One of the advanced features offered by Photoshop is the ability to work in a three-dimensional (3D) environment. However, for those who not familiar with this feature, it can be a bit confusing entering it and you could find yourself wondering “how to turn off 3d mode in photoshop”
In this comprehensive guide, we will walk you through the steps to exit 3D mode in Photoshop via screenshots, ensuring you switch back to the familiar 2D workspace.
Step-by-Step Guide to Closing 3D Mode in Photoshop
- Locate the 3D Panel
- Switch to the Layers Panel
- Select the 3D Layer
- Select the 3D Layer
- Verify and Adjust
Exiting 3D mode in Photoshop is a straightforward process that can be accomplished in a few simple steps. Follow the instructions below to seamlessly switch back to the 2D workspace:
1. Locate the 3D Panel
To begin, ensure that the 3D panel is visible on your screen. If it’s not, you can enable it by going to the “Window” menu and selecting “3D.” This will bring up the 3D panel, which contains various options and settings related to working in 3D mode.
2. Switch to the Layers Panel:
With the 3D panel visible, locate the Layers panel in Photoshop. You can find it by going to the “Window” menu and selecting “Layers.” The Layers panel displays all the layers in your document, including the 3D layer that needs to be exited.
3. Select the 3D Layer:
In the Layers panel, identify the 3D layer that you want to exit. Click on the layer to select it. You can verify that it’s a 3D layer by checking the layer thumbnail, which should have a 3D icon overlay.
4. Exit 3D Mode:
Once you have the 3D layer selected, navigate to the 3D panel. Locate the 3D menu icon (represented by three horizontal lines) in the upper-right corner of the panel. Click on it to access a drop-down menu. From the menu, select the option that says “close”. This action will convert the 3D layer back into a regular 2D layer, effectively exiting 3D mode.
5. Verify and Adjust:
After performing the above steps, take a moment to verify that you have successfully exited 3D mode. Check the Layers panel again and ensure that the layer you were working with is now a 2D layer without the 3D icon overlay. You can also examine the workspace to see if any other 3D-related elements or tools have disappeared, confirming the switch back to 2D.
Thoughts on Closing 3D Mode in Photoshop
Every year the program revolutionizes itself with new updates to improve performance and features to make workflows for users easier. These are aspects of the program that make the Photoshop learning experience an ongoing journey.
Understanding how to exit 3D mode is a crucial step in mastering this tool and enjoying your work if you accidentally trigger this feature or need to exit when through with it.
However, Adobe has announced the discontinuation of the 3D feature in its Photoshop series due to a shift in computing preference from open GL critical for 3D compatibility.
Users utilizing updates in 2022 may not experience this difficulty but if you find yourself struggling to close the 3D Photoshop view then our step-by-step outlined in this article should help you leave the 3d interface with no hassle!
Are there other easy tricks in Photoshop you find difficult like how to flatten an image in photoshop, fix grainy photos.
Our resource guide is a visual guide so solving these problems is Easy peasy. Enjoy!


